Upload Revolution Slider to My Website on My Wordpress
Sliders are a dandy design resource to use on a website. There are various slider plugins available online for those who want to add a slider on their website.
Ane such WordPress plugin is Slider Revolution – a responsive slider plugin that offers quite a expert number of effects.
Users can create a slider from scratch or choose one from over two hundred premade templates. This slider plugin includes interactive and dynamic furnishings that engage your visitors.
This article will explain how to add a slider in WordPress using Slider Revolution.
For a visual demonstration lookout man this video below. And so come dorsum for the step-past-step instructions provided in this commodity.
Overview of Slider Revolution
Slider Revolution has a Module Editor, too known as a visual editor, to create modules. Modules are containers for content.
They can be sliders, blog posts, carousels, social media feeds, hero units, and more than.
Users can make their own modules or apply ane of the many premade modules chosen templates. The Module Editor does not require any code.
It is a visual editor that uses a drag and drop interface to create and change modules.
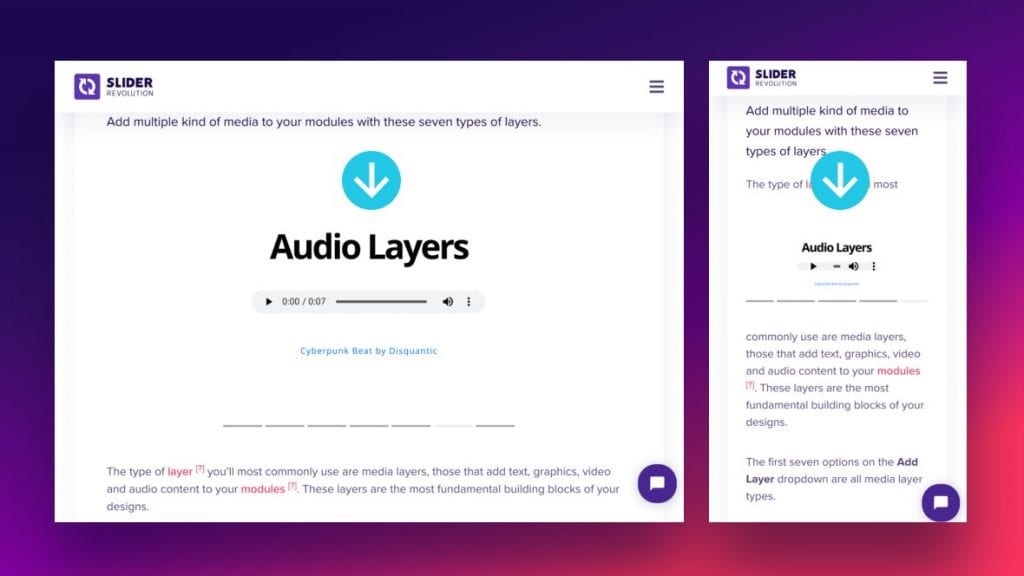
Users can insert modules into their existing website or create a new website made up of modules. Modules tin contain any blazon of media such as videos, GIFs, buttons, SVG'southward, audio, text, or images.
They tin also include animations and special effects. The Timeline feature controls the animation and stacking of layers. This feature allows users to make motion graphic animations.
In that location is as well a large selection of Add-ons. Add-ons extend the functionality of Slider Revolution and offering special effects.
Some special furnishings include transitions, whiteboard, particles, distortion, and shimmering.
Basic Process of How to Add a Slider in WordPress using Slider Revolution
The basic process of creating a slider with Slider Revolution is equally follows:
- Create a module
- Add slides
- Create layers
- Insert into WordPress
This article explains the process in detail, starting with how to create a module.
How to Create Modules
Users take two options for creating new modules. They can either create a blank module or edit a premade template module.
How to Create a Blank Module
A blank module provides users with an empty infinite and designing tools. The blank module choice is all-time for those who want to pattern a module from scratch.
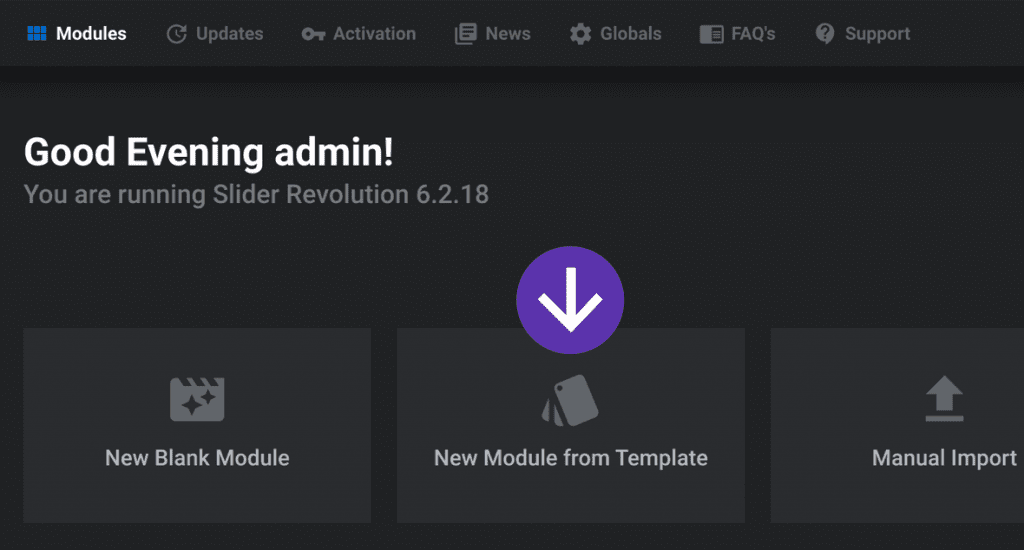
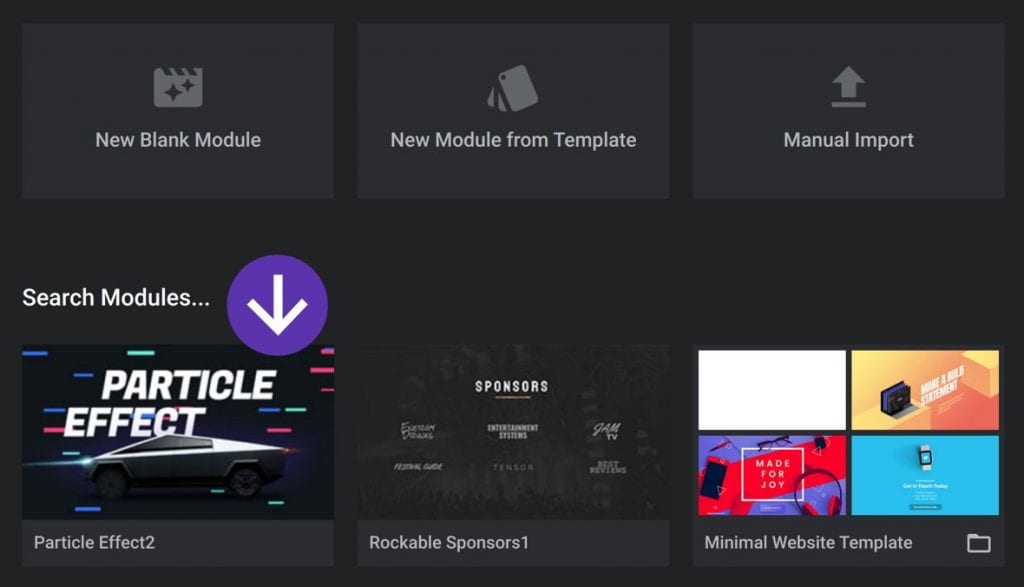
To start, click on the Slider Revolution plugin in WordPress. Click on the option titled New Blank Module.
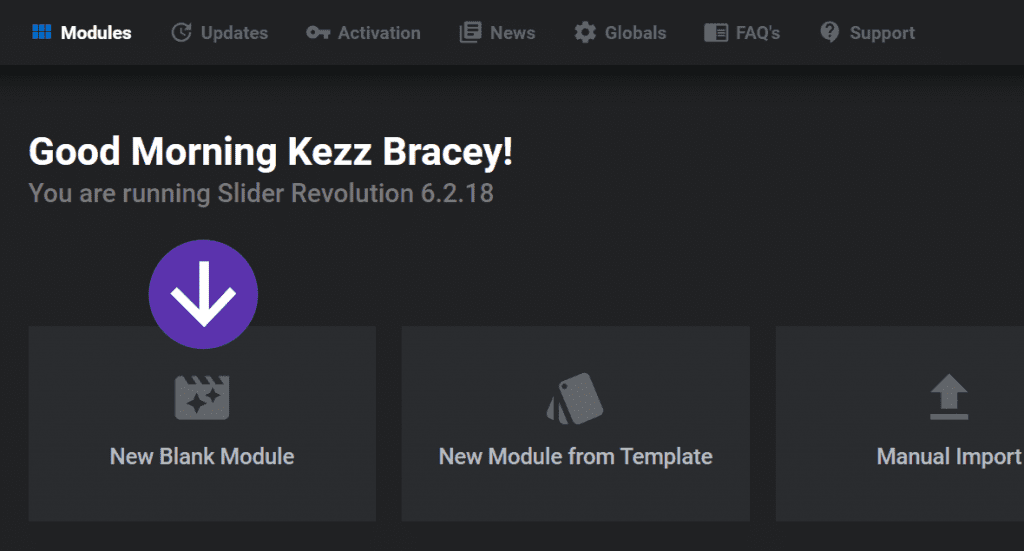
The plugin will and so directly users to the module editor and a Module Creation Guide will launch. The Module Cosmos Guide assists in bones configuration settings.
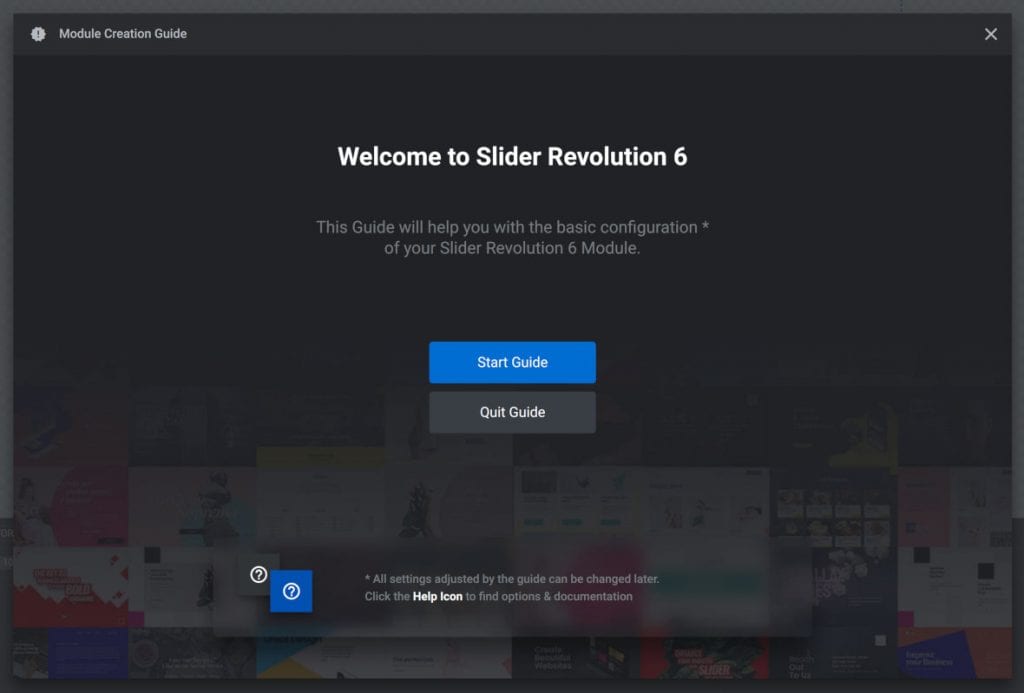
It offers two options: Start Guide or Quit Guide. If help is not needed for setting up the initial settings then select Quit Guide.
For those who would like help, click on Start Guide. The guide will keep to the configuration settings.
Module Cosmos Guide
The module creation guide offers iii pages of important initial settings.
Step i is to configure the module blazon. Stride 2 is to choose the size and pace three is to prepare up how the slider should resize on different devices.
Pace i: Module Type
First, the module cosmos guide volition ask what module type users would like to blueprint. It offers three different types: slider, scene, and carousel.
What does each of these module types do?
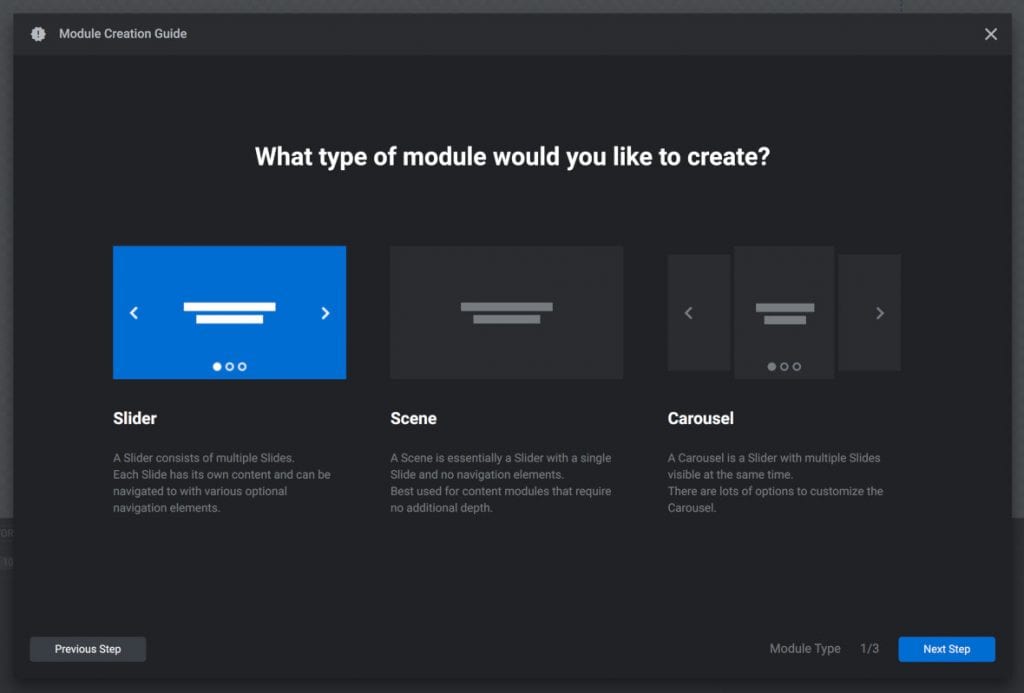
Slider Module Types:
A slider module has multiple slides. Visitors see one slide at a time.
The slides can change with navigation arrows, tabs, or be gear up to transition to the next slide on a timer. Here is an example of a slider that has navigation arrows and tabs:

Scene Module Type:
A scene has a single slide. Because a scene module has ane slide they do non include any navigational elements.
Scene modules are an fantabulous choice for the static elements of a website such as headers and menus.
Information technology is possible to build an entire site or landing page with Slider Revolution. In this example, users might want to stack many scene modules on top of each other.
Carousel Module Type:
A carousel module has multiple slides and displays more than ane slide at a time. The slides in a carousel module appear next to each other.
Visitors can pan through the slider with navigational arrows or tabs or they can click and drag from i slide to the other. The slides can also transition from one to the next on a timer.
Here is an case of a carousel slider that shows more one image at a time. This 1 includes navigational tabs and arrows:
Which Module Type to Use?
The scene module blazon is best for sliders that exercise not need to rotate. This might include video players, headers, menus, navigation bars, and postal service displays.
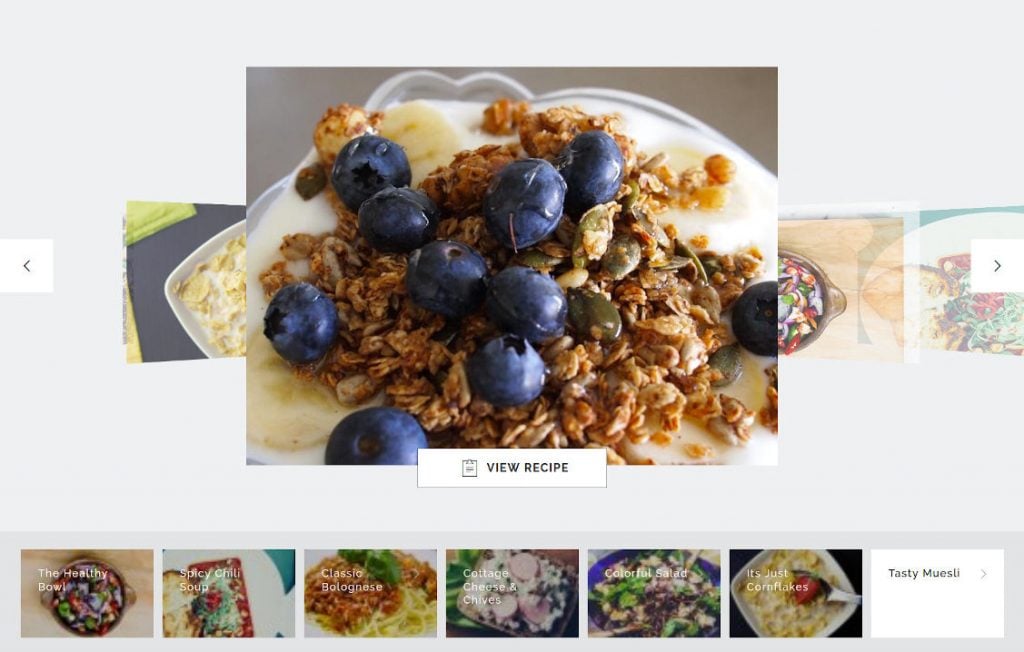
The slider and carousel module types are good choices for slideshow content. For example, recipes, portfolio images, products, etc.
After choosing the module blazon, click on the Next Pace push button found in the bottom right corner of the window. The module creation guide will continue to the next footstep of module size.

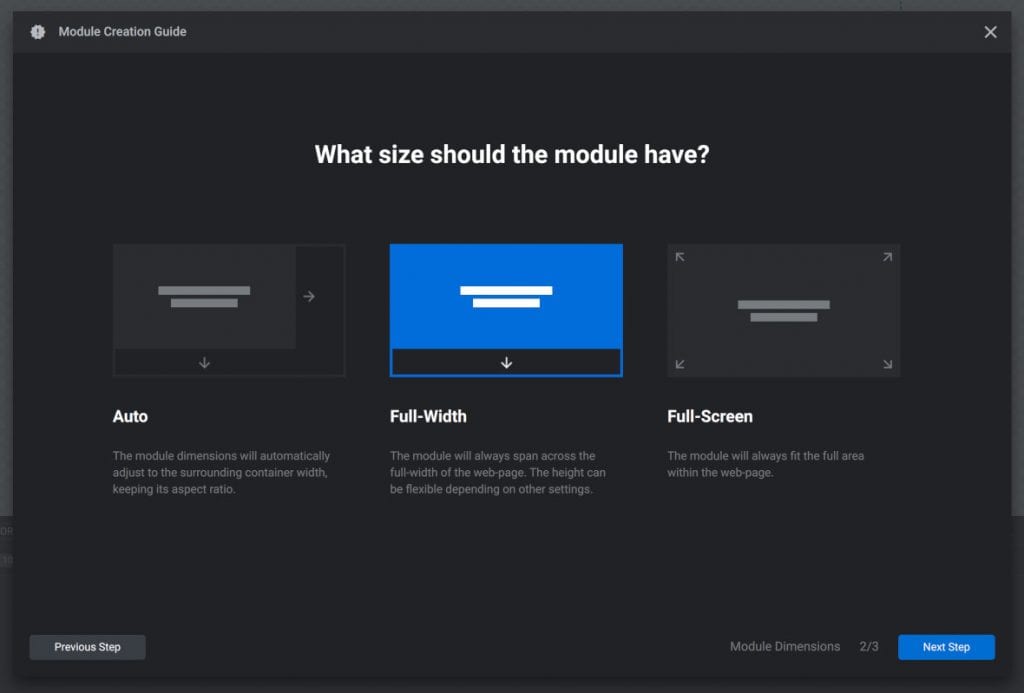
Step 2: Module Size
Again the module cosmos guide will display three options. These iii options control the width and pinnacle of the module.
The three options are auto, full width, and full screen.
Machine Option:
The auto option will adjust the module's width to fit inside its container. If posting a module within an article, the auto option volition adjust the size of the module to fit the size of the article.
For instance, if the article is 800 pixels wide, then the module volition accept the same size. The elevation will adjust with the width to maintain the proper attribute ratio.

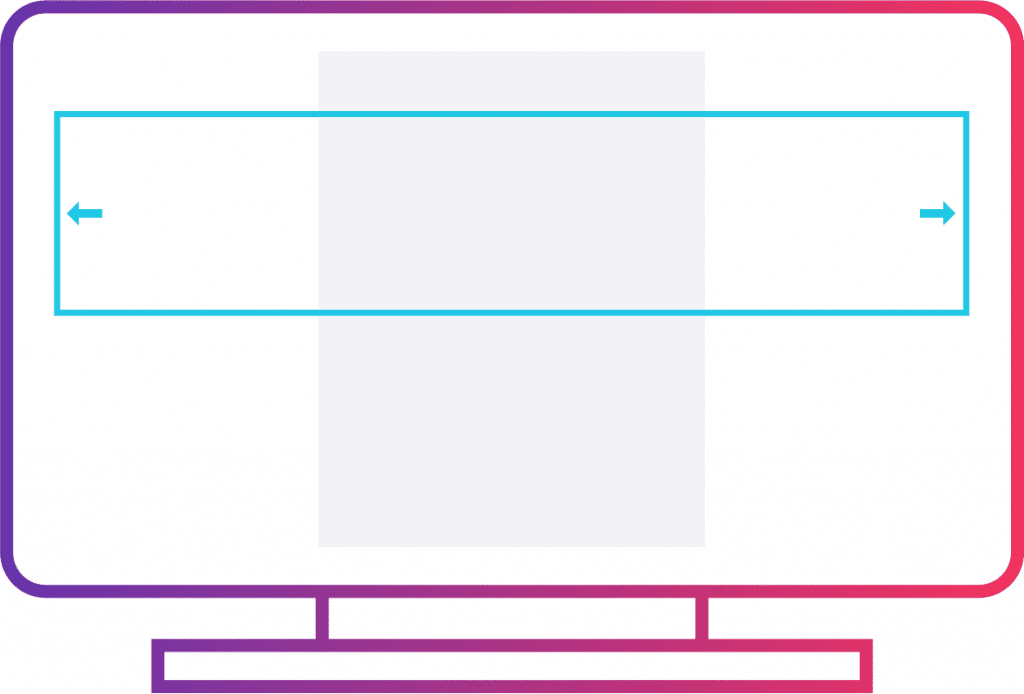
Full-Width Choice:
With the total-width option, the module takes up the unabridged width of the browser. The module will break out of its containers, and spread across the browser viewport.
The height of the module is stock-still and will not arrange. But users can change that in the layout settings to make the module maintain the attribute ratio.
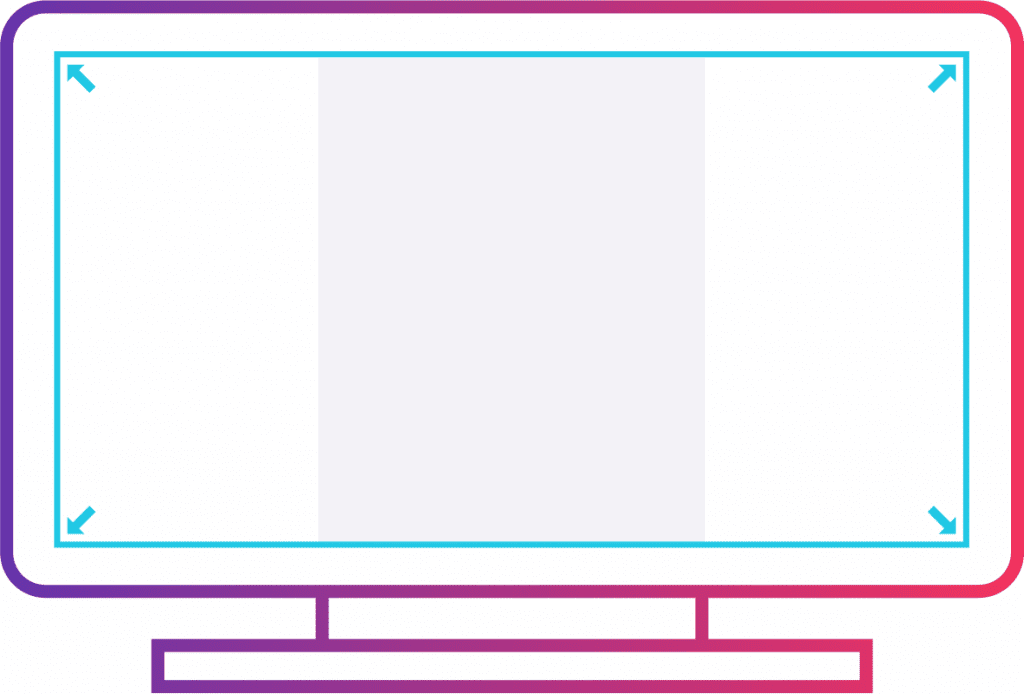
Total-Screen Choice:
The total-screen option makes the module suit to the width and meridian of the browser. Unlike the full-screen size of YouTube videos, visitors tin can however scroll to encounter the content in a higher place and below the module.
Merely the initial size of the module will fill up the unabridged browser screen.
What Size to Choose?
The machine option for modules is the best for a slideshow or video slider that will appear inline with a mail.
The full-width size is swell for banners, headers, or other content that spreads across the pinnacle of the website. It is also useful for showcasing products or an image slider halfway down the page.
The full-screen option creates an engaging visual presentation that captures visitor's attention. Background videos or big prototype sliders would expect good in a full-screen module.
After selecting the module size, click on the Next Footstep push button in the bottom right-hand corner. The module cosmos guide will take users to the concluding folio of configuration settings.
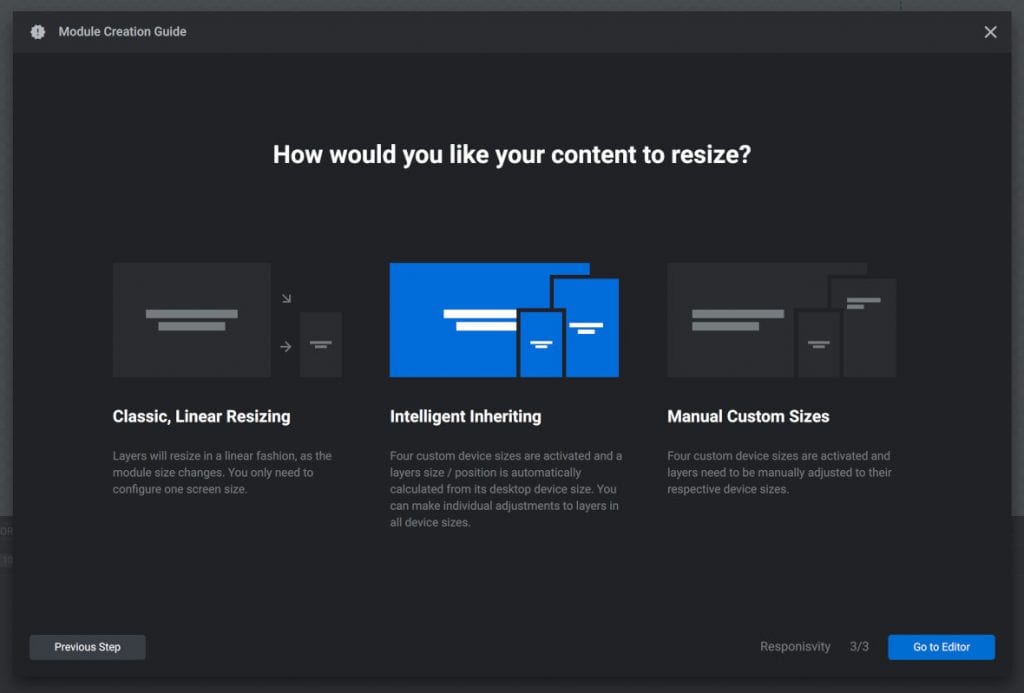
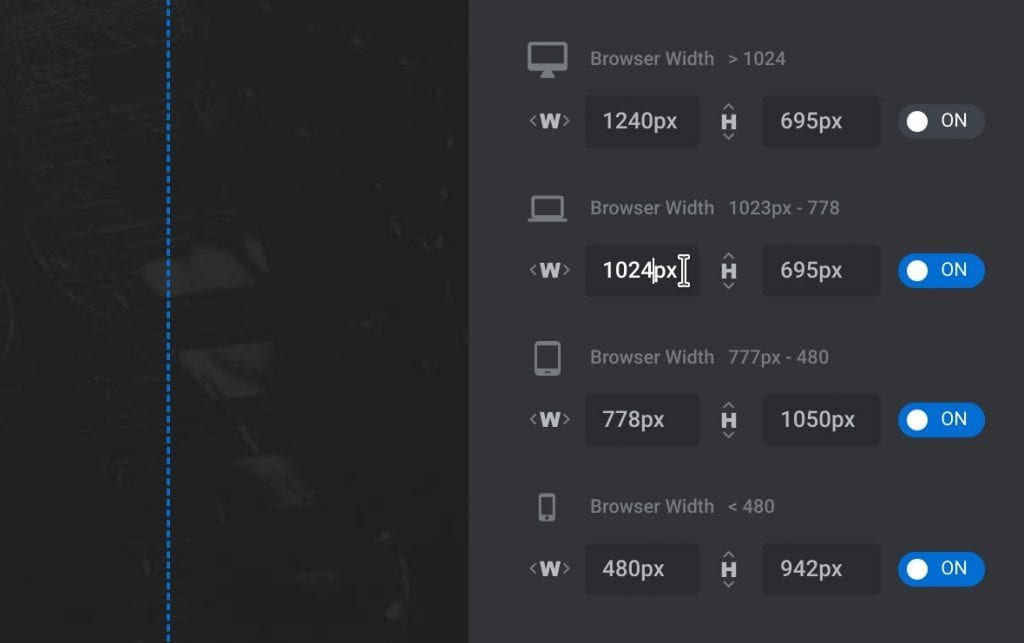
Step 3: Content Resizing
On the tertiary and final step, the module creation guide offers slider resizing options. This determines how the slider will resize according to the dimensions of different devices.
The three options are: classic linear resizing, intelligent inheriting, and manual custom sizes.
Classic Linear Resizing:
The classic linear resizing option shrinks the module to fit any size browser. The module will shrink just the aspect ratio will remain the aforementioned.
The layers within the module will also compress in proportion to the module. While this is the simplest option it comes with a disadvantage.
Because everything shrinks, some of the layers might exist hard to run across on a small screen.
Here is an example of classic linear resizing. The layout remains the same on different sized screens:
Intelligent Inheriting:
The second option is intelligent inheriting.
This selection makes 4 different sized versions of the module. Each version will accept a layout that suits a smaller and smaller screen.
Here is an example of Intelligent Inheriting. It adjusts the layout depending on the screen size of the device:

Manual Custom Sizes:
This option is similar to the intelligent inheriting choice. Information technology creates four versions of the module with dissimilar sizes.
Only instead of the slider plugin determining the sizes, the user has to fix the size for all four versions. Here are some settings available to users that want to arrange the layout size settings:
Which Resizing Option to Choose?
The classic linear option is all-time for modules containing simple content that will yet function when it shrinks. This could include sound histrion modules, video players, or basic slideshows.
Cull intelligent inheriting to go on layers big and visible on small screens. With this pick, Slider Revolution volition generate the layout size settings.
However, users can withal make manual adjustments to the layout sizes if they want.
The manual custom size selection suits users who want to fix the four layout versions to a specific size and position.
After choosing the resizing selection, click on Go to Editor in the lesser right-manus corner. The guide volition direct users to a blank slide.
At present information technology's fourth dimension to showtime the design procedure on the blank module.
How to Create a Module from a Template
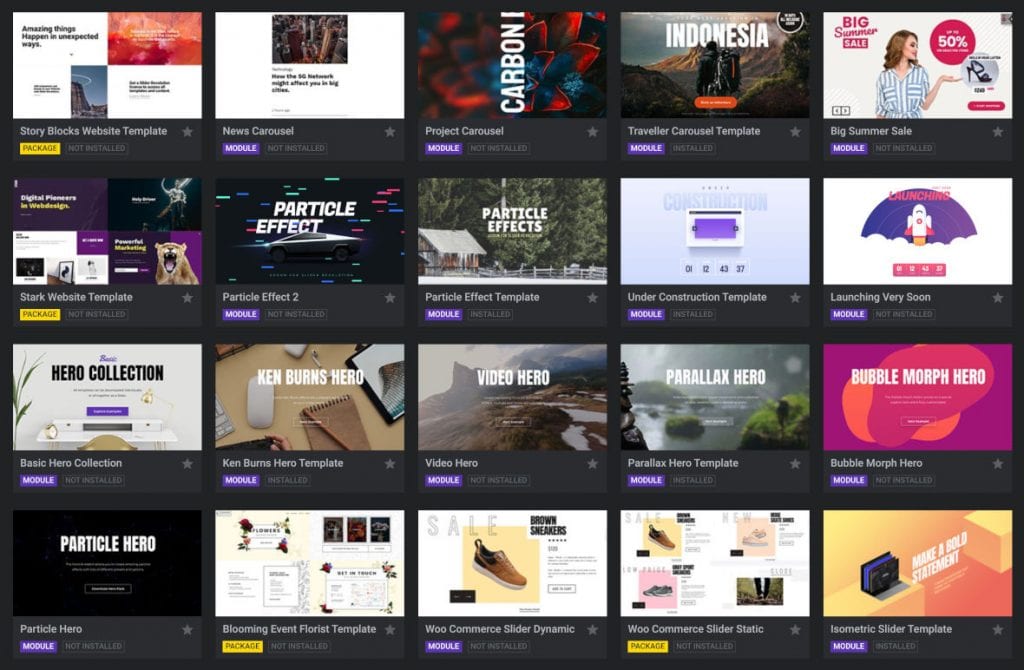
Slider Revolution plugin comes with more than than two hundred premade templates. And so for those who practice non desire to design a slider from scratch, they can modify a template to arrange their needs.
The templates can also exist used to create an entire website without a page builder. The following information will explain how to create a module from a template.
Why Employ a Premade Template ?
At that place are many benefits to using a template versus creating a module from scratch. Templates provide a premade blueprint format and include special effects.
This allows users to leverage templates to produce quality sliders fast. Even those with only a bones understanding of website blueprint tin utilise Slider Revolution's templates.
Templates also aid users to detect a blueprint they love and can include it on their site straightaway. Slider Revolution has more than than two hundred templates ready at the click of a button.
They are already bonny and engaging, then why non use them?
How to Go Started
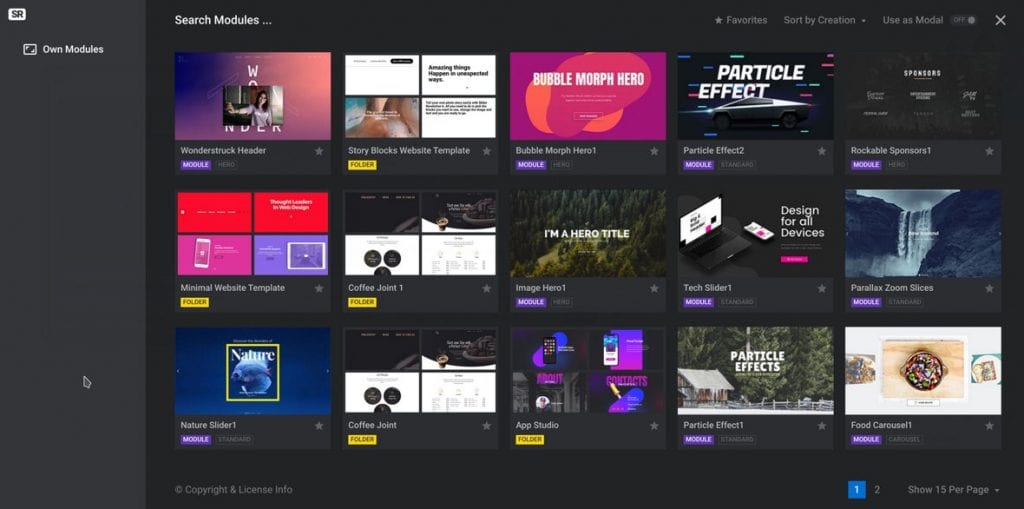
How to View the Templates
Start by clicking on the Slider Revolution plugin in WordPress.
Select the option New Module from Template. A gallery of premade module templates volition announced for users to browse.
Filters make it easier to ringlet through the more 2 hundred options.
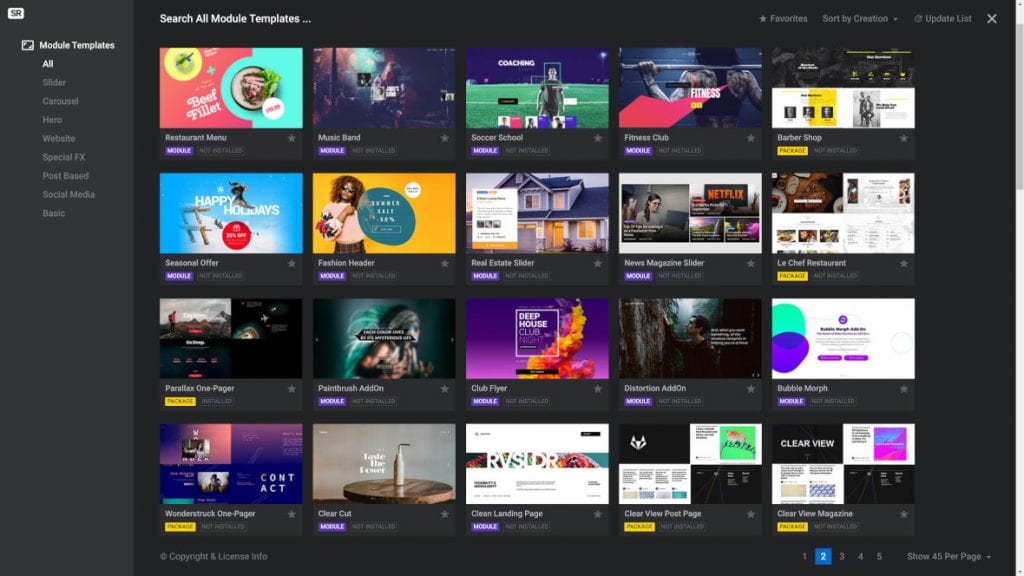
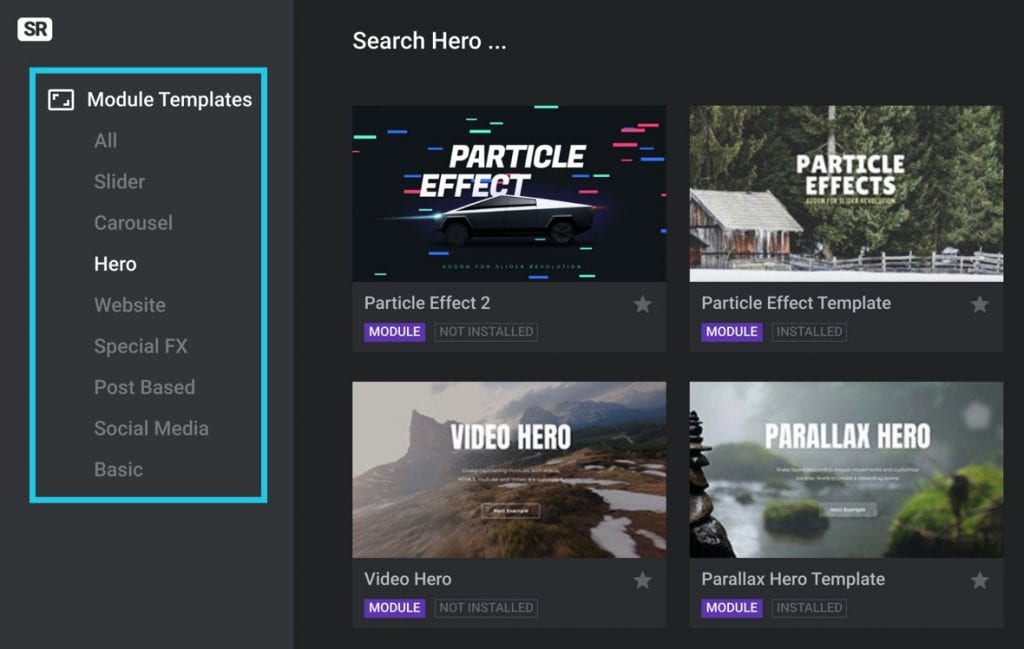
In the left-hand corner is a module template category list. Select 1 of the categories to filter the templates.
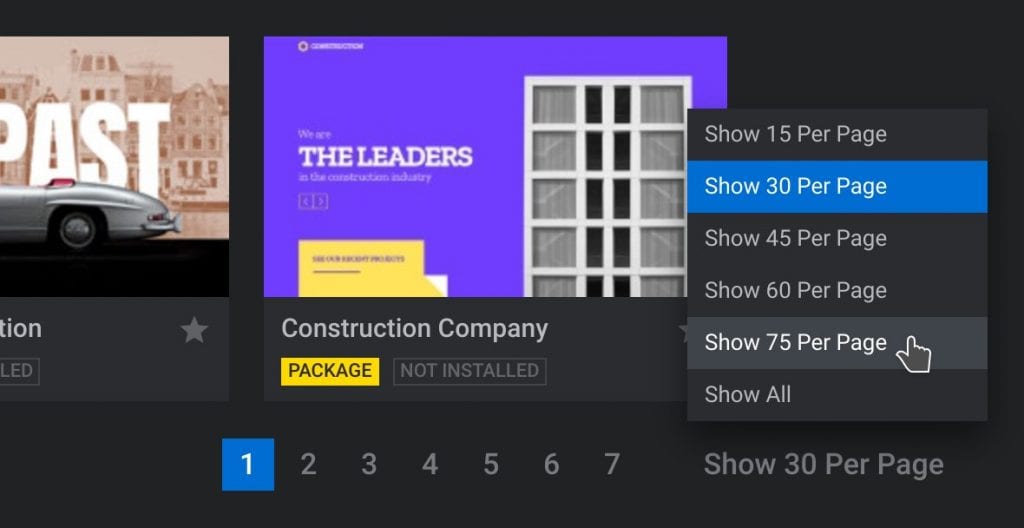
In the lower right corner of the window, users can alter the number of templates displayed. Click on the button then select how many thumbnail templates to view.
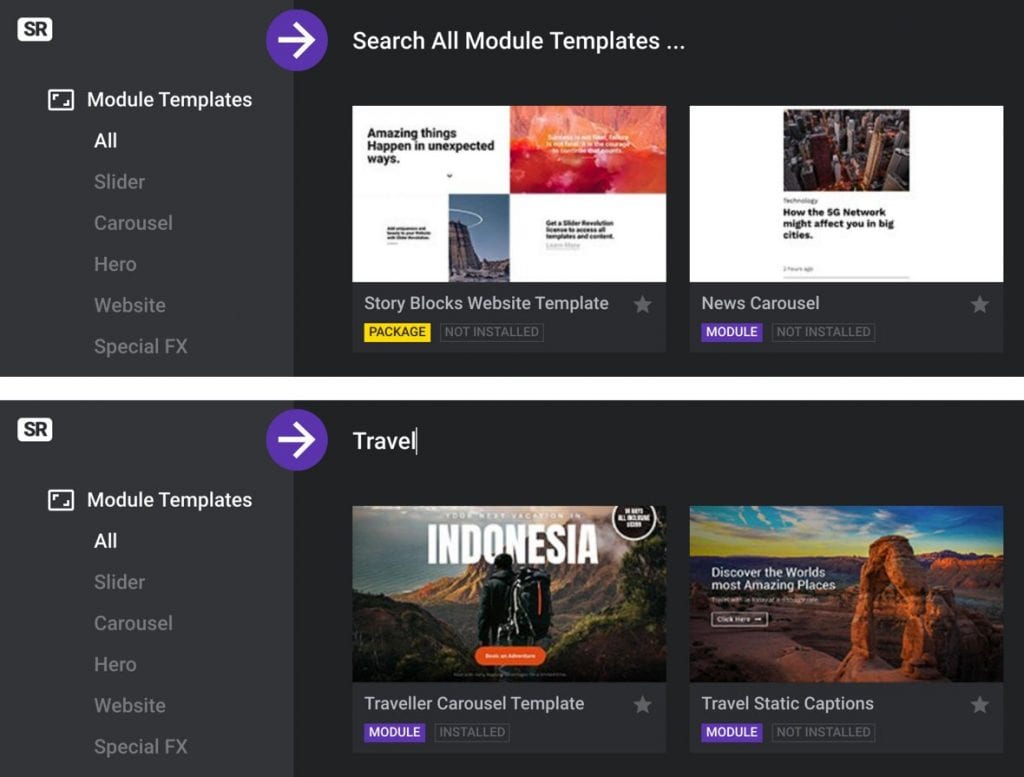
At the top of the folio, there is an option to discover templates past searching for keywords. Click on Search All Module Templates,blazon in a keyword, then press search.
In the top right corner, users can change the society of the search results to further filter the templates.
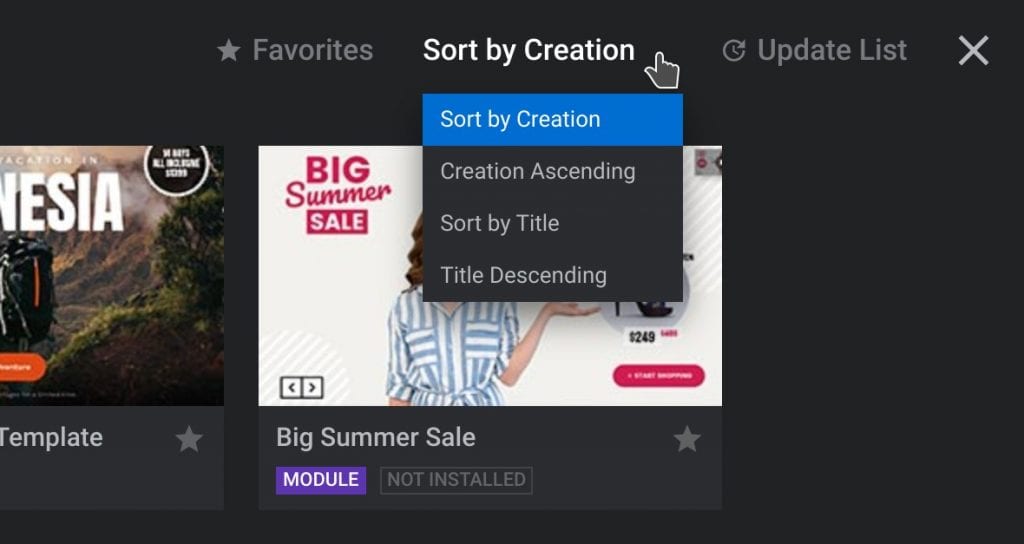
How to Save the Templates
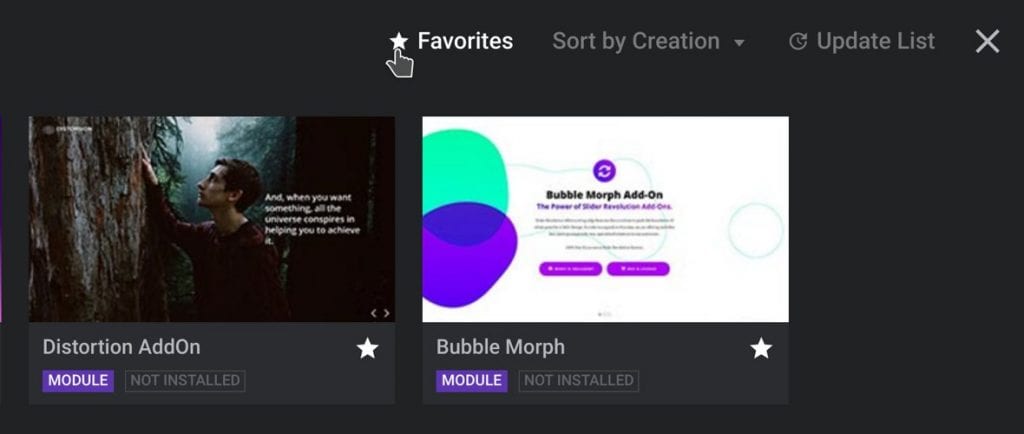
Users can save their preferred templates to their favorites. This means that they can continue looking through the gallery and come back to information technology later.
To add together a template to favorites click on the star icon that appears in the bottom correct corner of the thumbnail. The star volition so appear white, indicating that it is at present saved to favorites.
To view the saved templates, click on the favorite tab at the top of the window. The gallery will and so only brandish the saved templates.
Click on the aforementioned tab again to go back to the normal gallery view.
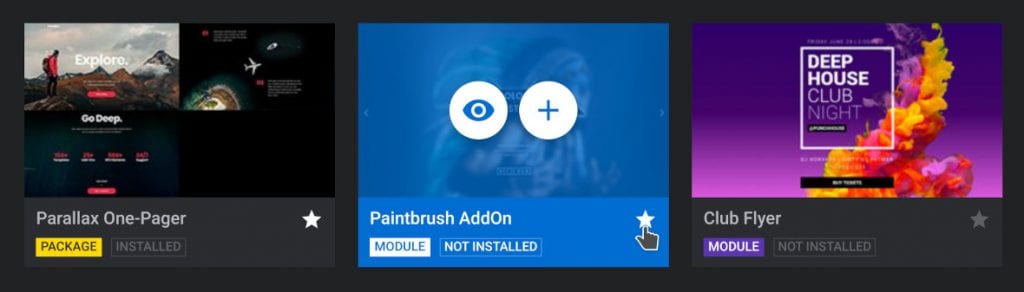
How to Preview the Templates
To preview a template in its full size, hover over the thumbnail. Some icons volition appear.

Click on the centre icon. The template will open up in a new browser tab.

How to Use a Template Module
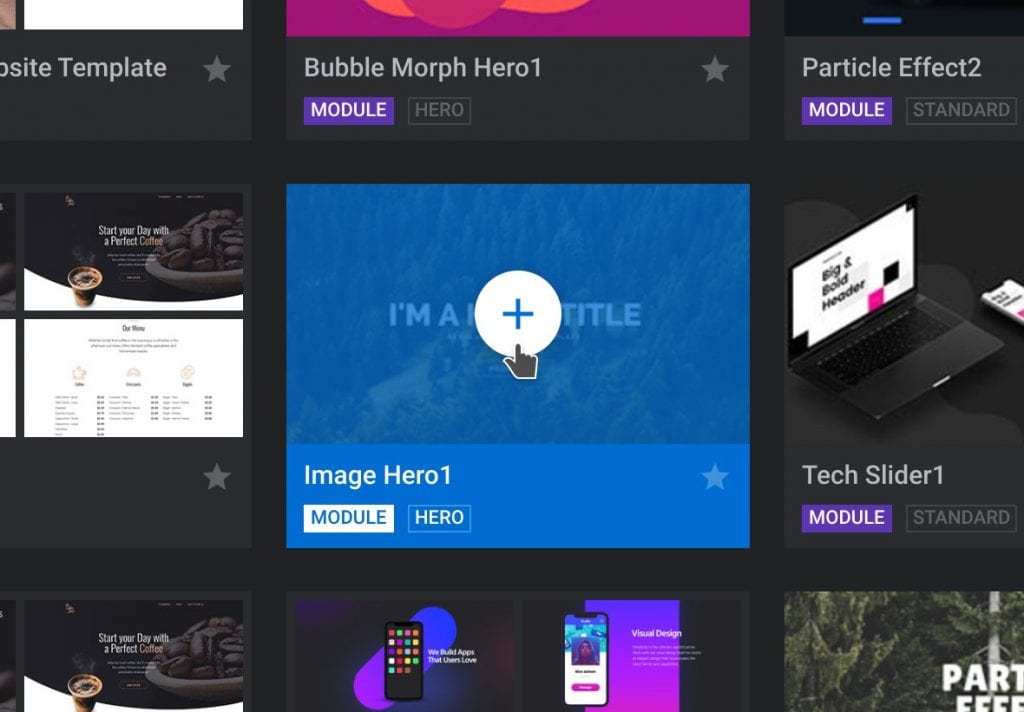
After selecting a template to use, it'south necessary to install the template.

To do then, hover over the thumbnail and click on the plus icon. A panel will appear that displays more information most the template.
To go on with the process and apply this module template, click on Install Template. Slider Revolution will download the files and create a module with the template's settings.
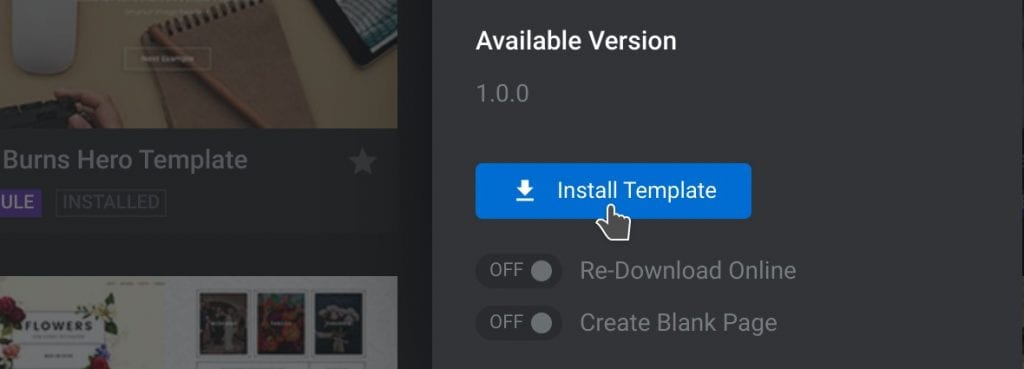
One time downloaded, the new module will announced nether the Search Modules section.
Adding Add together-Ons
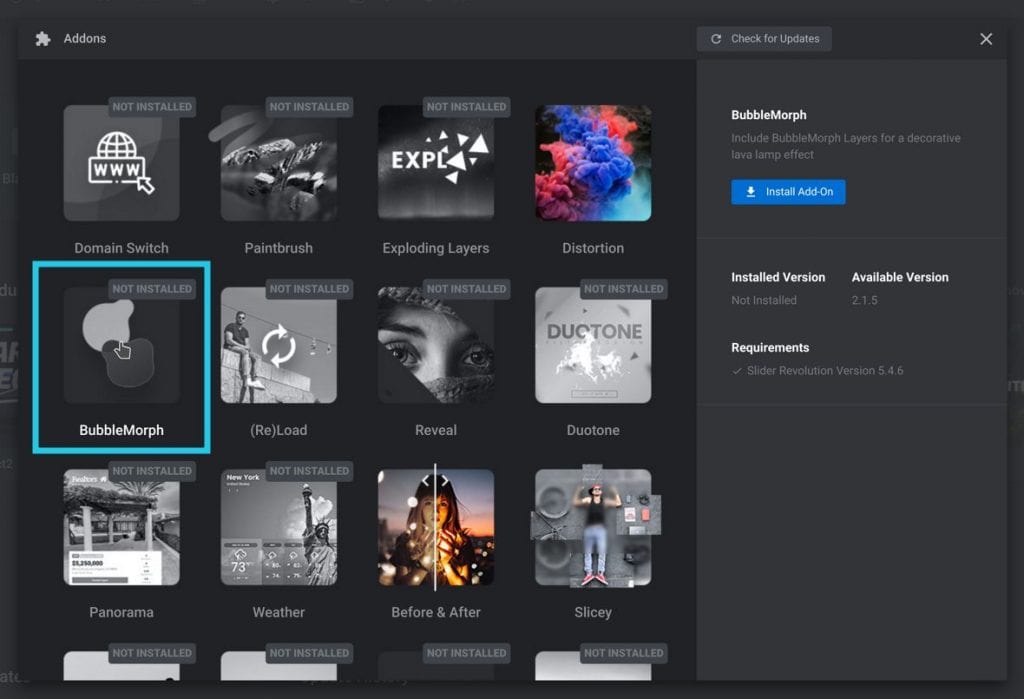
Slider Revolution has a big pick of add-ons for special effects. Users need to install add-ons before they can be used.
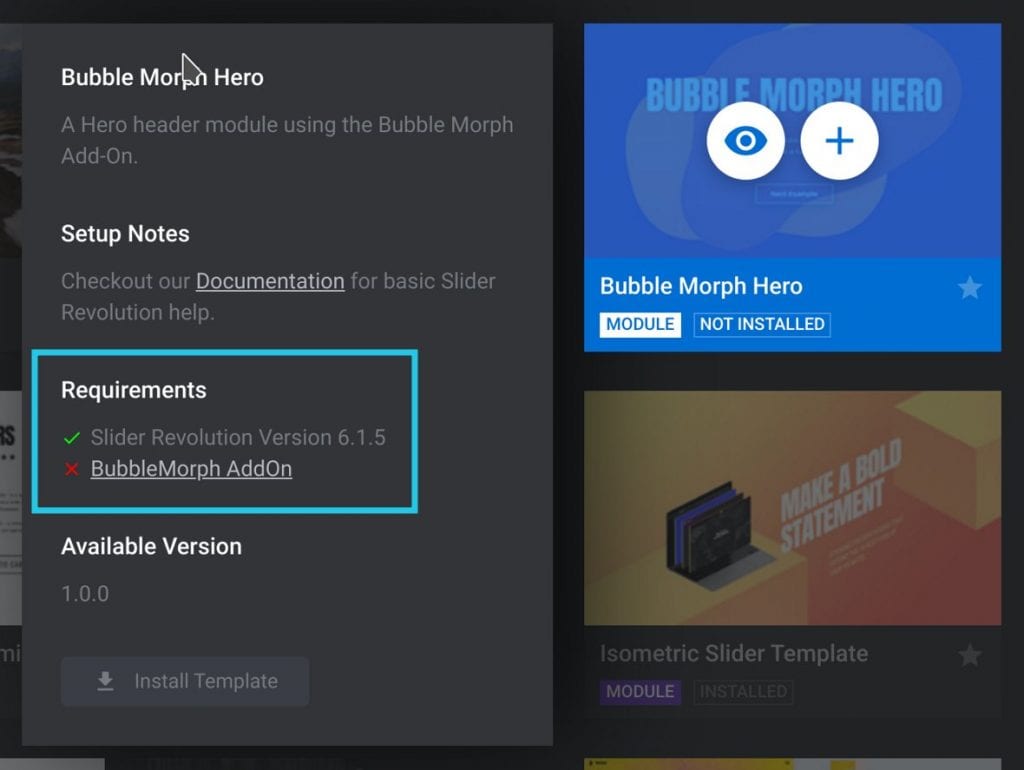
Some module templates utilize add-ons to heighten their design, add together effects, and functionality. To use a module template that includes add-ons, install and activate them beforehand.
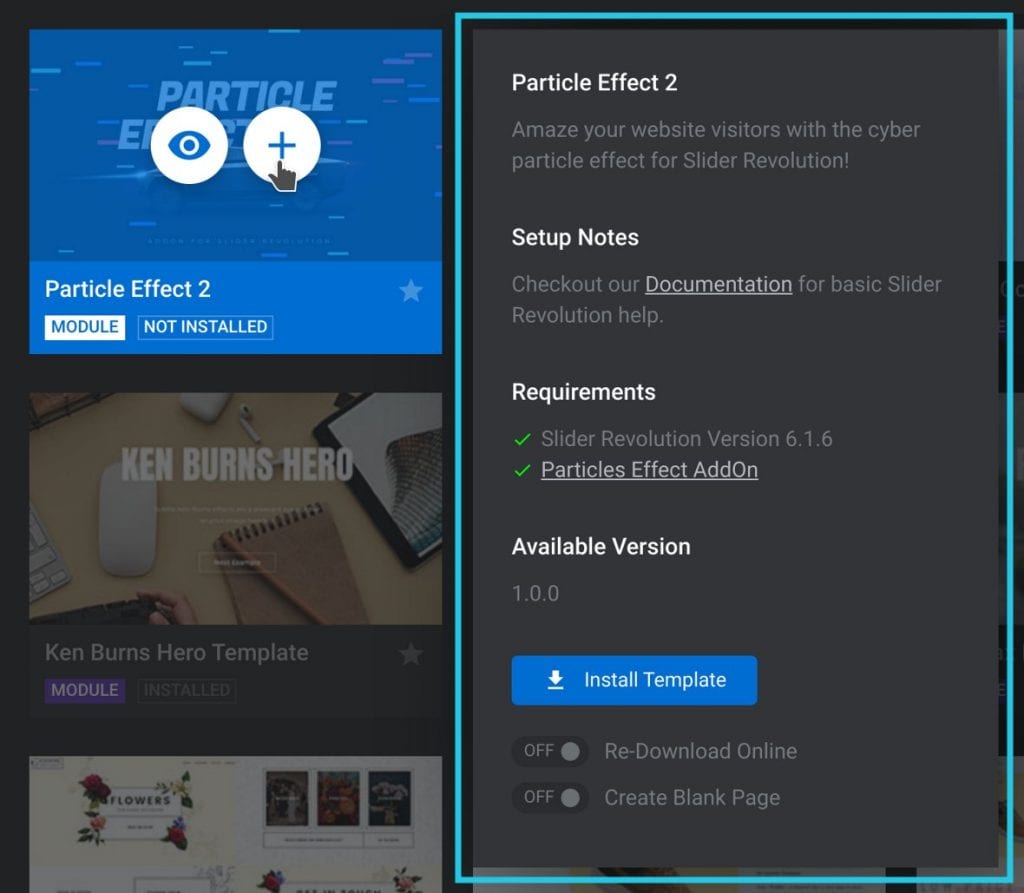
A module template cannot download if the add together-on it requires is not installed. To find out what add-ons a template needs hover over the template thumbnail.
Next, click on the plus icon. An data panel will appear.
Wait nether the Requirements section to see what add-ons it uses. Installed add-ons will accept a green checkmark.
The ones that still demand installing will accept a cherry-red 10 by them. Here is an example of a template that has one improver installed but requires one more:
How to Install Add-Ons
To install an add-on it's necessary to exit the template gallery. Brand sure to save the desired template in favorites or make a annotation of information technology and so you can detect it over again.
Besides, make a note of which add together-ons to install and activate. To exit the template gallery click on the Ten that appears in the tiptop correct corner.

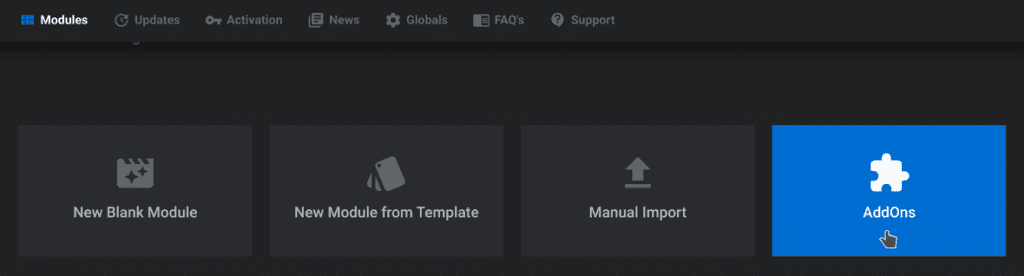
From the master Slider Revolution interface, click on the Add-Ons selection. A window will appear that displays the add together-ons.
Find the required add-on and click on it. The installation details for that improver will appear in a sidebar to the right.
In the sidebar, click on the Install Add-On push button.

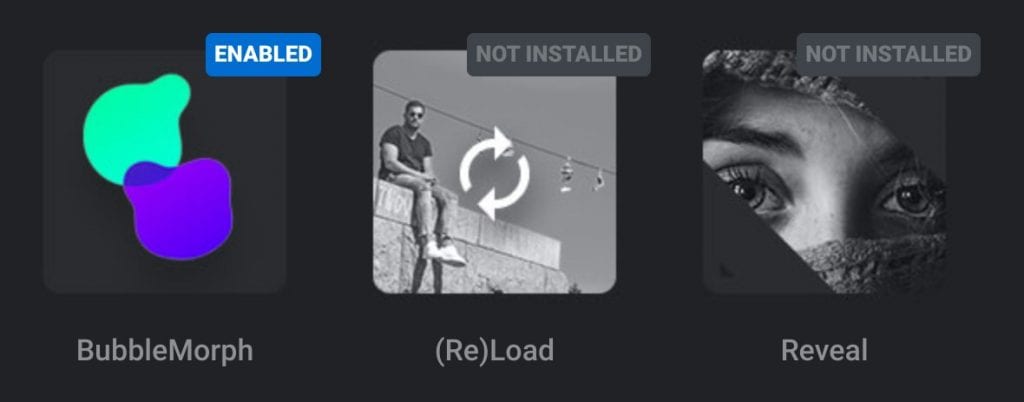
The add-on will download and install. Side by side, click on the Activate Add-On button in the sidebar.

The thumbnails of the activated add-ons will go from black and white to colour. Also, an ENABLED tag volition appear in the right corner of the thumbnail.
This indicates that the addition is at present activated and set to use. Repeat these steps to install all the add-ons required.
Hither is an example of the BubbleMorph add-on thumbnail. It is displayed in color.
This shows that information technology is installed and activated. The other black and white thumbnails are not:
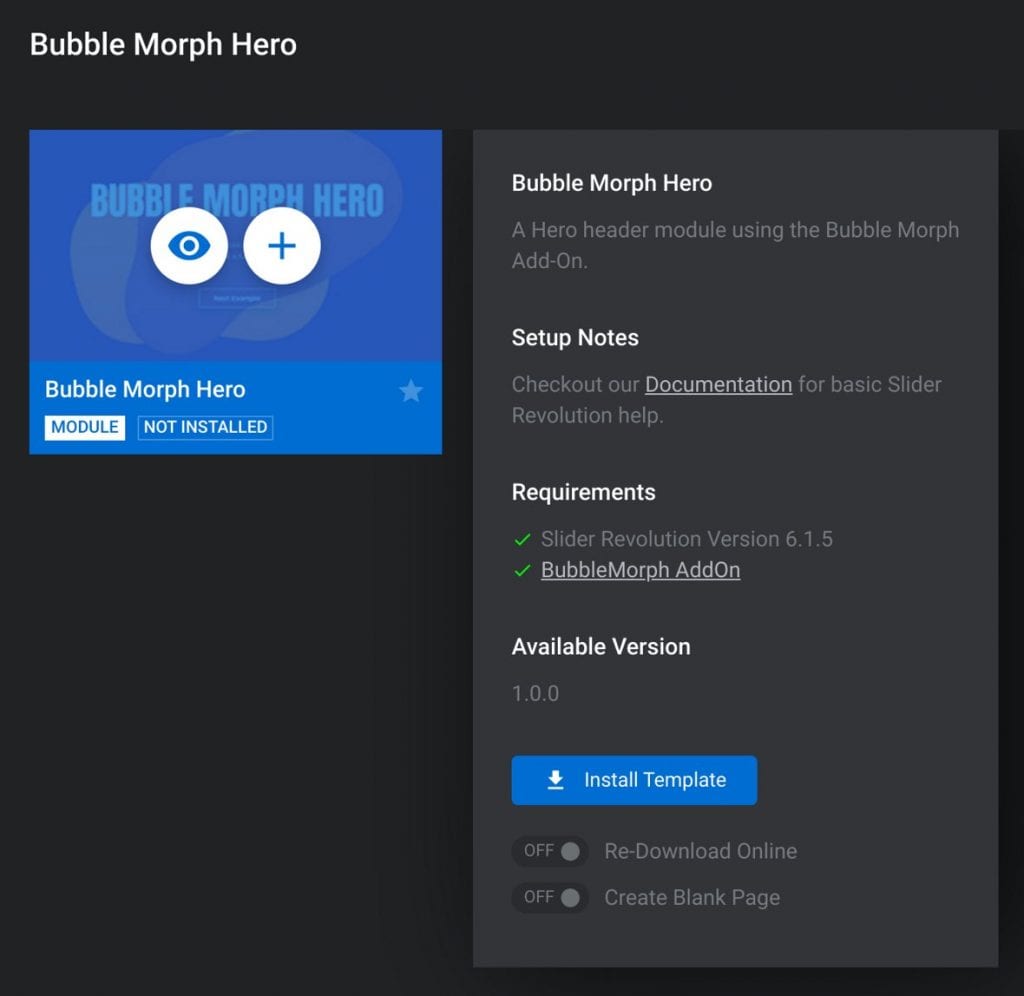
Having installed all the required add-ons, get back to the module template gallery. Locate the desired template and hover over the thumbnail.
Click on the plus icon. At present nether the Requirements section, the add-ons should have a green checkmark.
Click on Install Template to download the module.
How to Insert a Module to a Post or Page
After installing the template and add-ons users can modify the modules to their needs. For basic editing techniques, click here.
After designing a module, the final step is to add the slider into WordPress equally a mail or on a page. To insert a slider into WordPress users tin use shortcodes.
Or they can utilise the Slider Revolution cake that comes with the plugin. Outlined below is how to add sliders on WordPress using the new Gutenberg block editor.
For those unfamiliar with Gutenberg blocks, this article explains how to use them.
How to Add a Slider in WordPress Using Slider Revolution Blocks
One way to insert a slider in WordPress is to employ the Slider Revolution block. First, go to the WordPress editor of a page or a mail and add a new Slider Revolution Block.
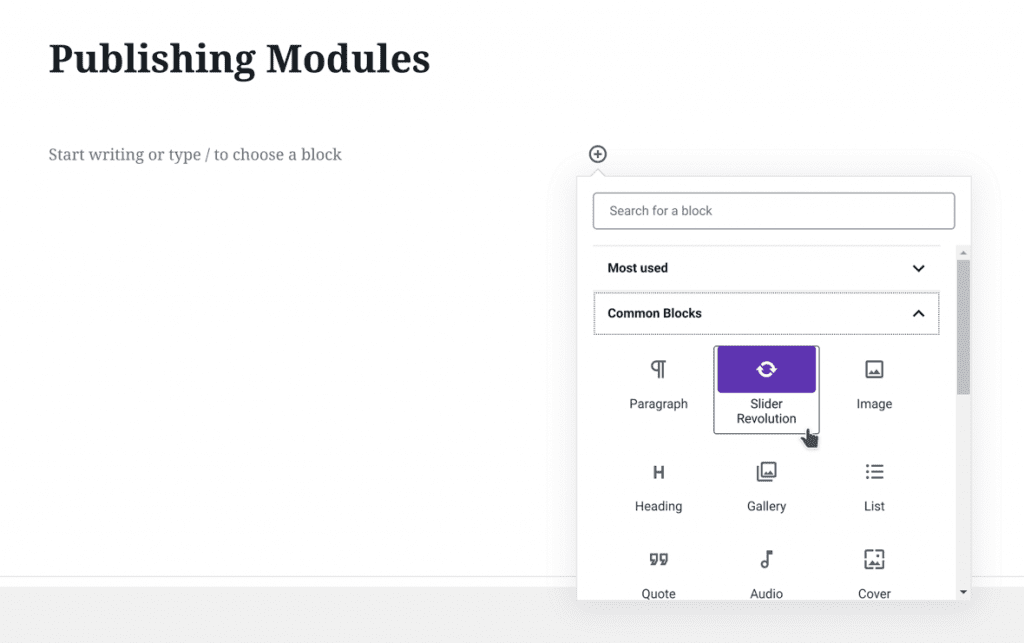
After adding the block, a gallery will open that displays the created modules.
To insert one of these modules to the post or page, hover over the thumbnail. So, select the plus icon to insert the module.
Having inserted the cake, users can adjust the slider settings. Click on the cake settings button that appears in the correct corner.
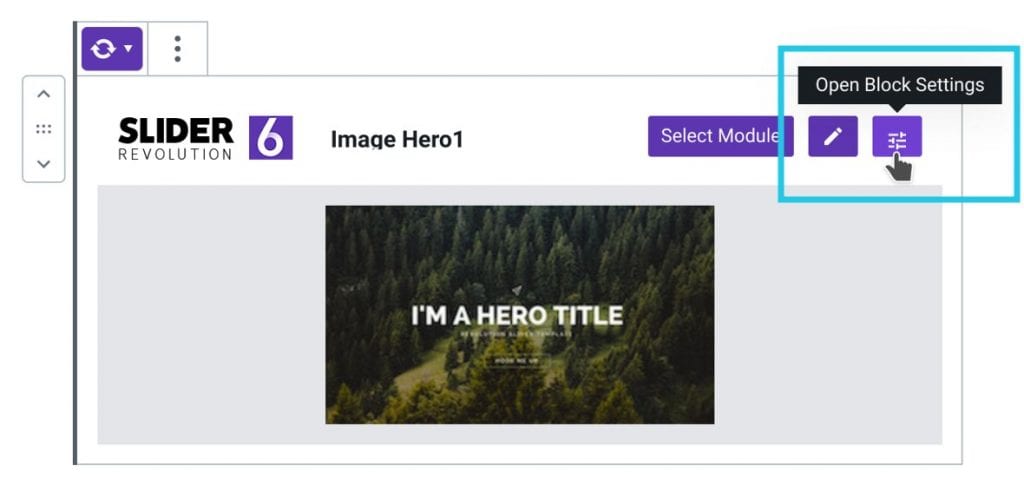
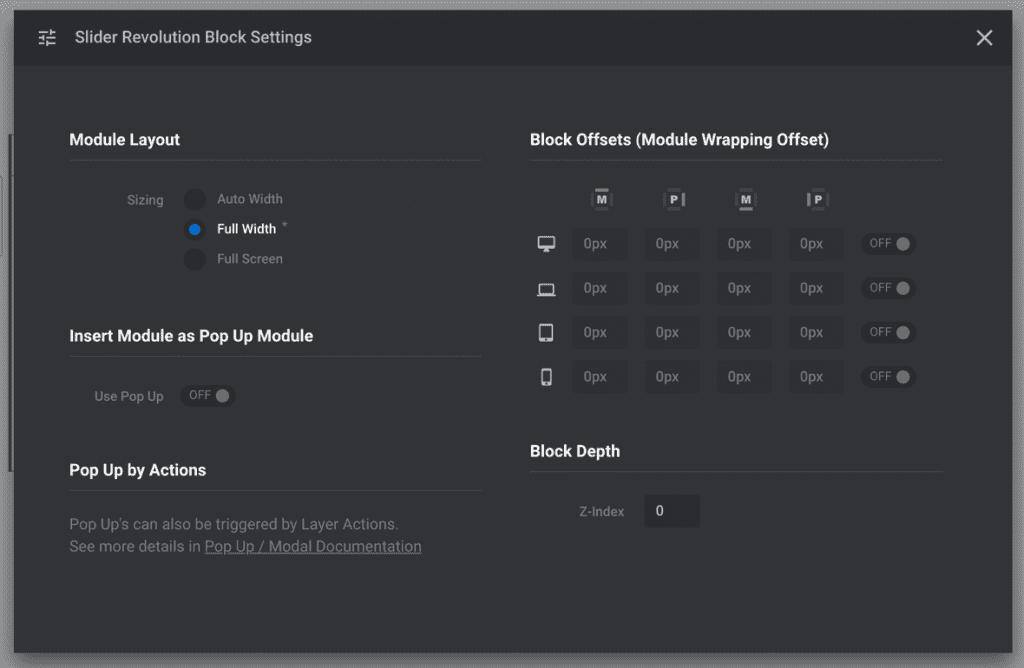
This contains the configuration settings that control how the module interacts with the website. For example, users tin can change the size of the module.
This article discussed the 3 dissimilar module size options earlier. Users can modify those settings here.
There's likewise the option to add Block Offsets which adds an empty space around the module'southward sides. Here are some slider settings that the user can change:
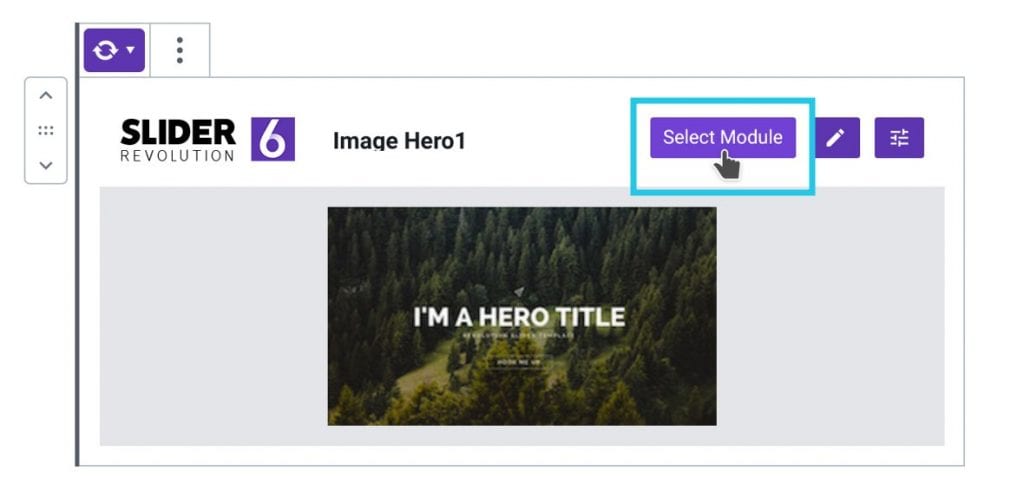
The Slider Revolution block as well allows users to modify the module that they want to insert. Click on the Select Module button.
Then select a different module to insert it.
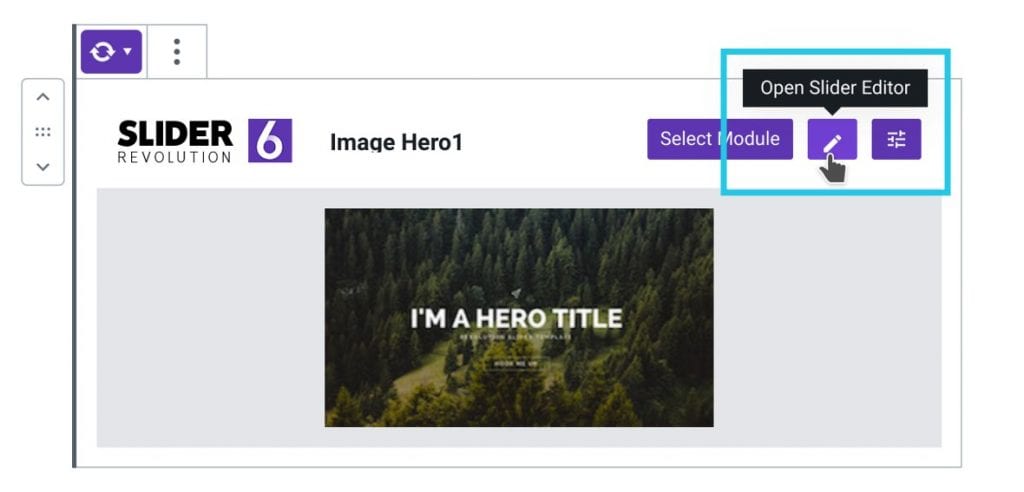
The pencil icon directs users to the module editor to make more edits or adjustments to the module.
How to Add a Slider in WordPress Using Shortcodes
It is also possible to insert a slider in WordPress using shortcodes. Locate the desired module in the Slider Revolution plugin.
Hover over the module and then click on the down arrow at the bottom to brandish some settings. Click on Embed.
The Standard Module Embedding window will open up and display the shortcodes. Copy the shortcode by clicking on the blueish copy icon to the right.
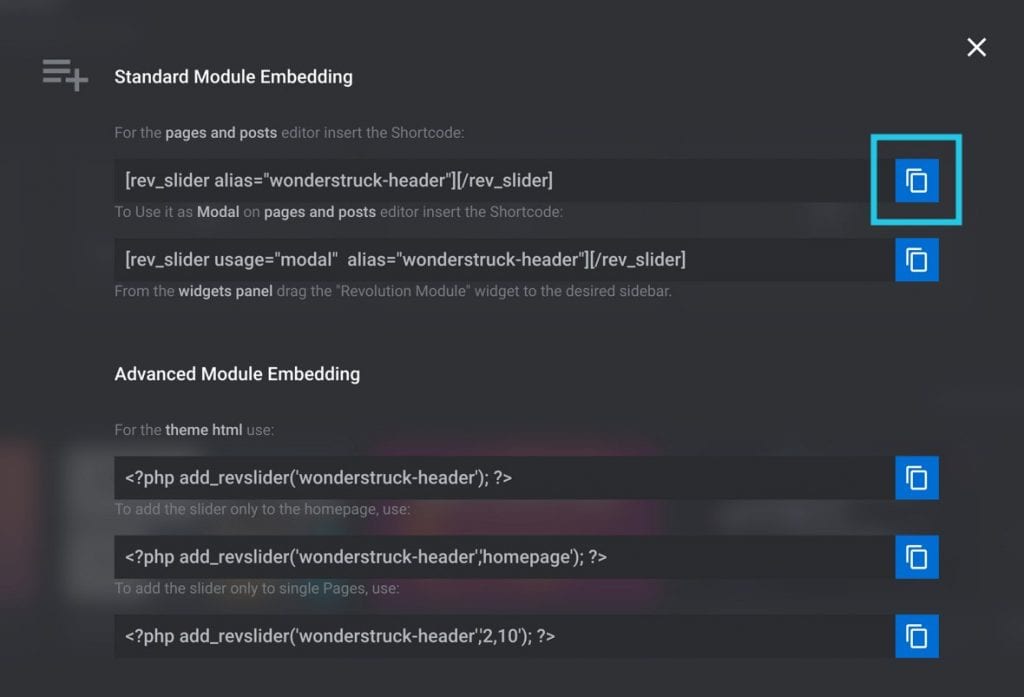
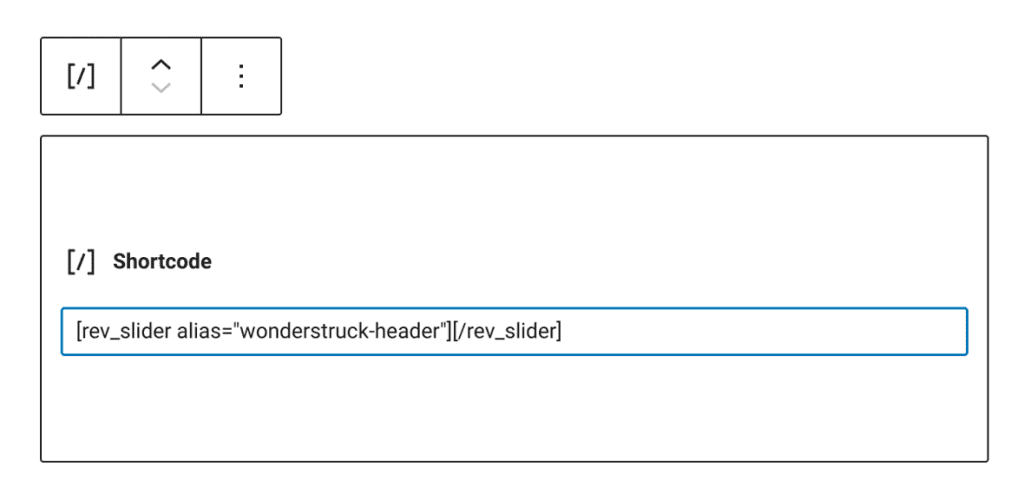
Adjacent, get to a WordPress post or page editor and paste the shortcode in it. This will create a Gutenberg shortcode block.
Publish the Folio or Post
After calculation the slider module using either shortcodes or blocks, hit Publish. Preview the post to encounter what the module looks like on the frontend.
That is how to add a slider in WordPress in a few easy steps.
If you enjoyed reading this article on how to add a slider in WordPress, you should check out this commodity on the particle outcome.
Nosotros besides wrote about similar topics similar using a hero slider, a video slider, a homepage slider (see the blueprint here?). But as well about the Ken Burns result that we use in some of our slider templates, as well as WordPress themes with sliders included, WordPress video background, website sliders, and slider animation examples.

Source: https://www.sliderrevolution.com/design/how-to-add-a-slider-in-wordpress/
0 Response to "Upload Revolution Slider to My Website on My Wordpress"
Post a Comment